Listing the Installed OSes
All the open source operating system versions are delivered as part of the UForge repository. Proprietary operating systems are not.
From the UI you can see the installed OSes by going to the Administration page and going to the Distributions tab.
All the open source operating system versions are delivered as part of the UForge repository. Proprietary operating systems such as Red Hat Enterprise Linux or older operating system versions (that have been EOL’d) are not; therefore it is the responsibility of the end customer (or reseller if they have correct agreements in place to re-distribute an operating system) to have the original ISO images of the operating system in questions.
Note
You can only add an operating system version that is officially supported by the UForge AppCenter and has been certified by Fujitsu.
Listing the Enabled OSes with CLI
To get a list of the operating systems that are currently enabled on your UForge platform, run the CLI run the command uforge org os list.
Login to one of the UForge instances:
$ uforge org os list -u $ADMIN -p $PASS
Getting operating systems ...
Success: Found the following operating systems
+----------------+-----------------+--------------+--------+---------+---------+------------------+
| Distribution   | Version         | Architecture | Access | Visible | Default | Release Date     |
+----------------+-----------------+--------------+--------+---------+---------+------------------+
| CentOS         | 6.3             | i386         |   X    |         |         | 2012-07-01       |
| CentOS         | 6.3             | x86_64       |   X    |         |         | 2012-06-26       |
| CentOS         | 6.4             | i386         |   X    |         |         | 2013-03-01       |
| CentOS         | 6.4             | x86_64       |   X    |    X    |         | 2013-03-01       |
.... rest omitted for clarity
Adding an OS to an Organization
You can add a supported OS using the UI or using the CLI.
Older operating system versions (that for example have been EOL’d) or proprietary operating systems such as Red Hat Enterprise Linux are not automatically populated at the installation phase. Population of such operating system versions must be done manually after the initial installation of UForge is complete.
Note
You can only add an operating system version that is officially supported by the UForge platform and has been certified by Fujitsu.
Before adding an OS to the organization you must retrieve data from the Fujitsu repository. For more information refer to Adding OS Distributions.
Adding an OS Using the UI
In order to add an OS to an organisation you manage:
- From the
Administrationpage, go to theDistributionstab.- Click on
addin the top left.- Select the distribution, version and architecture from the list.
- Click
add.- You must add repositories to this distribution from the list of
Available repositorieson theRepositoriestab. The repositories that you can add are listed in the bottom list. The top list is the list of repositories that have been added.To add a repository, check it from the bottom table and click
add selected. It will now appear in the top table.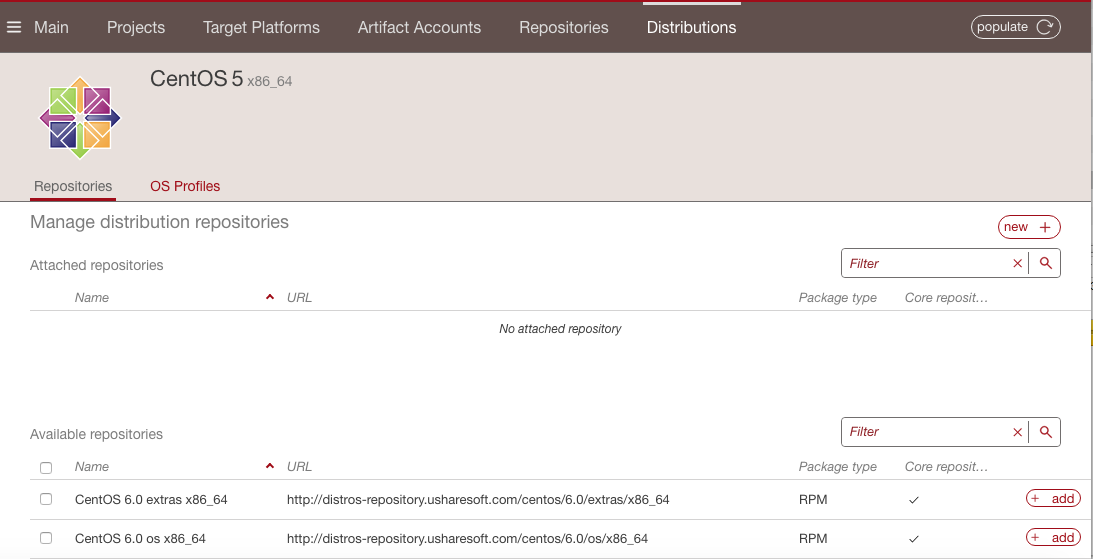
Note
You can also create new repositories by clicking on
new. You will be redirected to the page to create new repositories. For more information, refer to Creating a Repository Using UI.
You must populate the repositories. To do so, click on
populateat the top right and follow the instructions in the pop-up window.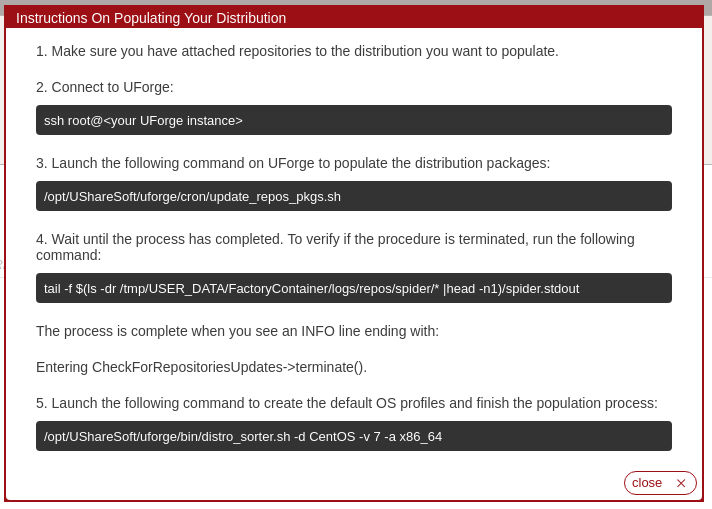
Note
The populate process will provide the base OS profiles.
To add an OS profile (opional), go to the
OS Profilestab. You can create one by clicking onadd os profilein the top right. Refer to Creating Custom OS Profiles with UI.
When adding CentOS, Debian and Red Hat, the major versions are automatically marked as Milestones when the distribution is added to the platform. For more information on Milestones, refer to Creating and Managing Milestones.
Adding an OS Using the CLI
In order to add an OS to an organization you must do the following:
- Connect to one of your UForge platform instances.
- Create the distribution in the organization.
- Create the repositories. This includes the official repository (see Official UForge Tool Repositories) as well as the specific UForge tool repository (see Specific UForge Tool Repositories). This is covered in steps 6 and 7 in the section Example for Adding CentOS.
- Attach the repository to the distribution.
- Launch Spider to fill the repositories with the packages.
This must be done for each version of an OS. For example CentOS 6.5 i386. It is not possible to do this for all CentOS versions at once.
For example, to add CentOS 6.5 i386:
- Add the distribution to the organization, using the official name and version.
$ uforge org os add --name CentOS --version 6.5 --arch i386 -u $ADMIN -p $PASS
Getting default organization ...
Success: Add operating system OK
- Create the repositories.
$ uforge org repo create --name CentOSplus --repoUrl http://vault.centos.org/6.5/centosplus/i386 --type RPM -u $ADMIN -p $PASS
Getting default organization ...
Success: Created repository with url [http://vault.centos.org/6.5/centosplus/i386] to default organization
+------+----------------+------------+---------------------------------------------+-------+
|   Id | Off. Supported | Name       | Url                                         | type  |
+------+----------------+------------+---------------------------------------------+-------+
|  355 |                | CentOSplus | http://vault.centos.org/6.5/centosplus/i386 | RPM   |
- Attach the repository to the distribution.
$ uforge org repo os attach --name CentOS --version 6.5 --arch i386 --repoId 355 -u $ADMIN -p $PASS
Getting default organization ...
Success: Attach distribution to repository [355]
- Launch Spider and other population steps. Refer to Adding OS Distributions.
When adding CentOS, Debian and Red Hat, the major versions are automatically marked as Milestones when the distribution is added to the platform. For more information on Milestones, refer to Creating and Managing Milestones.
Creating a Repository Using UI
You can manage existing repositories and create new ones from the UForge UI, from the Administration page.
Go to the
Repositoriestab. The existing repositories will be listed.To create a new repo, click on
add repositoryin the top right.Enter the name and URL.
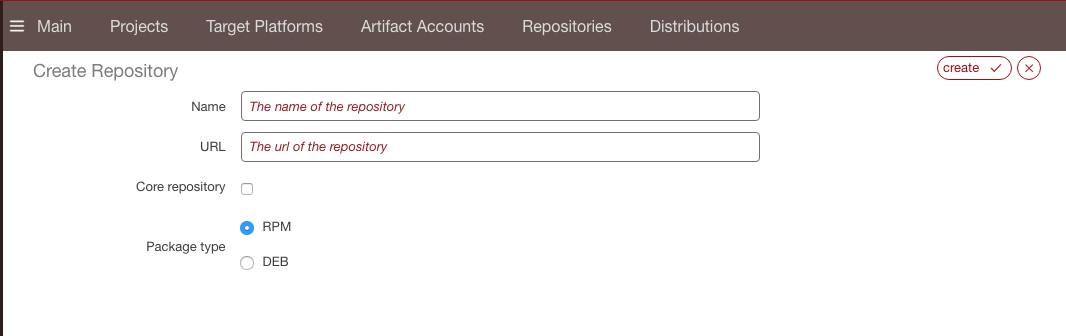
Note
Check
core repositoriesfor all the default repositories of officially supported OSes (for a list of supported OSes, refer to the sectionSupported Operating Systemsin the User Guide). Do not check this box for repositories that are not part of the core distribution, such as epel or VMware tools. When generating a machine image, packages tagged ascoreare installed first, before other packages.
Updating a Repository Using CLI
You can manually launch an update of a specific repository using uforge org repo refresh. To do this, you must have the repoId, which you can find using uforge org repo list. For example, to launch the update:
$ uforge org repo refresh trigger --repoId 355 -u $ADMIN -p $PASS
In order to view the status of a repository update, launch:
$ uforge org repo refresh status --repoId 355 --refreshId 887 -u $ADMIN -p $PASS
To view a list of all the updates launched, use: uforge org repo refresh list.
Removing OSes and Distributions
You cannot remove an OS from an organization once added. You can only disable it, in which case it can no longer be used.
To disable a distribution, for example CentOS, for all users of an organization specify only the OS name, in which case all the versions will be disabled:
$ uforge org os disable --name CentOS -u $ADMIN -p $PASS
If you only want to remove a specific version of a distribution (for example CentOS 5), run:
$ uforge org os disable --name CentOS --version 5 -u $ADMIN -p $PASS